
I wanted to repurpose my raspberry pi to be a garage door opener. I tried several different methods to make this work, but wasn’t happy with how it was coming out, so I came up with more-or-less my own easy custom solution that I wanted to share.
Of course, you have to start by setting up Raspian on the Pi.
Then, enable VNC, SSH, and the camera in the settings.
VNC makes it a heck of a lot easier to log in once you've put the pi in the garage.
There were three things I needed to add to my Pi:
A camera
A relay switch
and a reed switch
Next, there are 4 pieces of software to install:
1. Apache (will allow you to create a web page to control the pi from a phone)
https://www.raspberrypi.org/documentation/remote-access/web-server/apache.md
2. Webcam (so you can look and see what state the garage door is in, as a visual check)
https://www.raspberrypi.org/documentation/usage/webcams/
3.Node.js (allows for the algorithms to be written in javascript, my language of choice)
https://www.instructables.com/id/Install-Nodejs-and-Npm-on-Raspberry-Pi/
This one is a little tricky! You have to follow the directions to get the exact right copy of the file for your Pi. The full listing of available zip files is here https://nodejs.org/dist/v10.16.0/
Note: You may also have to install sudo apt-get install npm and sudo npm install
4. OnOff (this is the javascript tool that allows you to check the GPIO pin conditions)
https://www.npmjs.com/package/onoff
And then comes the wiring. Your Pi has 40 GPIO pins to control external devices.

In short, you are going to use Java to look at the pins and either turn them on and off, or to evaluate whether the circuit is complete.
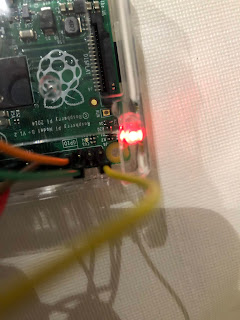
First the relay. I pinned it to GPIO4, Ground, and a 5V

Then, I created a javascript that looks like this:
'use strict';
const Gpio = require('../onoff').Gpio; // Gpio class
const led = new Gpio(4, 'out'); // Export GPIO4 as an output
led.writeSync(1);
led.writeSync(0);
// Turn off after 3 seconds
setTimeout(_ => {
led.writeSync(1);
led.unexport(); // Unexport GPIO and free resources
}, 3000);


For the reed switch, I pinned it to GPIO17 and a 3.3v

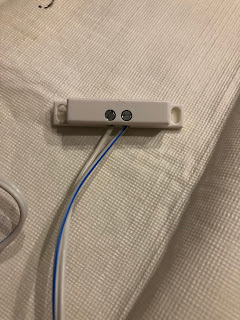
Note: I connected the wires to longer wires so I could run it across my garage. Doesn't matter which is which on this end.
Then, I created a javascript that looks like this:
'use strict';
const Gpio = require('../onoff').Gpio; // Gpio class
const led = new Gpio(17, 'out'); // Export GPIO17 as an output
console.log (led.readSync());
if (led.readSync()==0) { console.log ("open")};
if (led.readSync()==1) { console.log ("closed")};
Save it, and call it whatever you want - by running node yourfilename2.js you will to see if the reed switch is closed or not - closed would indicate the door is closed.
And that is 99% of the work.
Next up is the html so that it will look like you want it to, and allow for "remote control"
Of course, you have to start by setting up Raspian on the Pi.
Then, enable VNC, SSH, and the camera in the settings.
VNC makes it a heck of a lot easier to log in once you've put the pi in the garage.
There were three things I needed to add to my Pi:
A camera
A relay switch
and a reed switch
Next, there are 4 pieces of software to install:
1. Apache (will allow you to create a web page to control the pi from a phone)
https://www.raspberrypi.org/documentation/remote-access/web-server/apache.md
2. Webcam (so you can look and see what state the garage door is in, as a visual check)
https://www.raspberrypi.org/documentation/usage/webcams/
3.Node.js (allows for the algorithms to be written in javascript, my language of choice)
https://www.instructables.com/id/Install-Nodejs-and-Npm-on-Raspberry-Pi/
This one is a little tricky! You have to follow the directions to get the exact right copy of the file for your Pi. The full listing of available zip files is here https://nodejs.org/dist/v10.16.0/
Note: You may also have to install sudo apt-get install npm and sudo npm install
4. OnOff (this is the javascript tool that allows you to check the GPIO pin conditions)
https://www.npmjs.com/package/onoff
And then comes the wiring. Your Pi has 40 GPIO pins to control external devices.

In short, you are going to use Java to look at the pins and either turn them on and off, or to evaluate whether the circuit is complete.
First the relay. I pinned it to GPIO4, Ground, and a 5V
Pi Pin . Relay input
2 VCC
6 GND
7 IN2
(Note: in a previous version of this post, I noted the ground as pin 4; the picture was correct. I made a typo)


Then, I created a javascript that looks like this:
'use strict';
const Gpio = require('../onoff').Gpio; // Gpio class
const led = new Gpio(4, 'out'); // Export GPIO4 as an output
led.writeSync(1);
led.writeSync(0);
// Turn off after 3 seconds
setTimeout(_ => {
led.writeSync(1);
led.unexport(); // Unexport GPIO and free resources
}, 3000);
Save it, and call it whatever you want - by running node yourfilename.js you will cause the relay to turn on and then off again 3 seconds later.
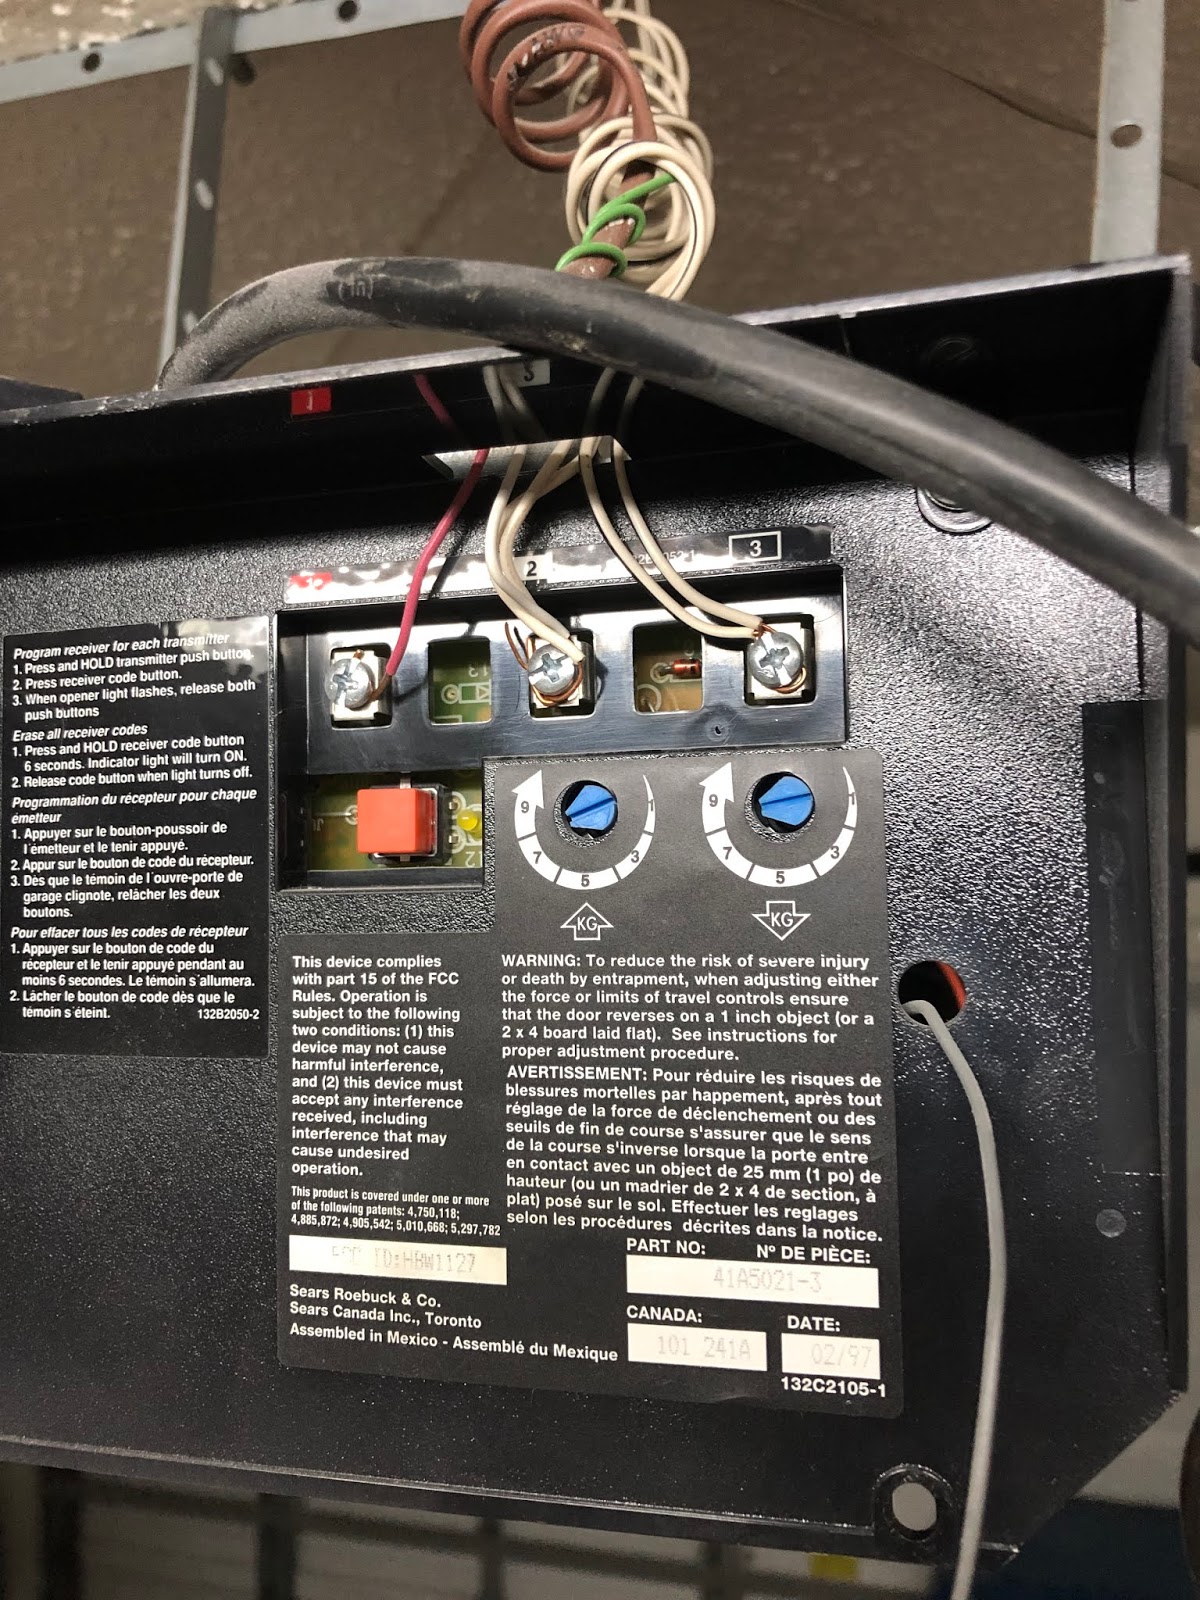
On the relay end, you want to attach two wires, which will open a circuit when the relay comes on. The other ends of the wire attach to the opener itself, in my case to the left most screws. When the circuit opens, the connection is shorted and the door opens or closes.

Cool right?


Note: I connected the wires to longer wires so I could run it across my garage. Doesn't matter which is which on this end.
Then, I created a javascript that looks like this:
'use strict';
const Gpio = require('../onoff').Gpio; // Gpio class
const led = new Gpio(17, 'out'); // Export GPIO17 as an output
console.log (led.readSync());
if (led.readSync()==0) { console.log ("open")};
if (led.readSync()==1) { console.log ("closed")};
And that is 99% of the work.
Next up is the html so that it will look like you want it to, and allow for "remote control"